Make a Homemade Bow and Arrows: An Easy Tutorial
I think my oldest son was in first grade when he started trying to make a homemade bow and arrows set. He would tie yarn to sticks and shoot smaller sticks across the yard. It wasn’t long before he advanced his bow making skills and today, all four of my older boys have found great fun in crafting their own homemade bow and arrows.
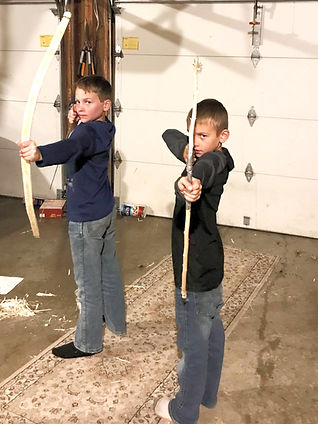
Two homemade bows: One made from a sapling, and one cut out of a branch and sanded to shape. Both shoot well!
Of course, you could just BUY a bow and arrow set. But, as a homeschooling mom that has a lot of sons and usually forgets to plan an arts and crafts project, I am quite happy when my sons find a hands-on project that they can create and enjoy without my help.
I had to ask them how they made their homemade archery, because they are entirely self-taught when it comes to crafting their weapons. They love archery and inspired this recent article: The Thrill of the Bullseye: Why Boys Love Archery . I hope you read it!
The bow and arrow is a classic weapon and tool that has been used for centuries. It is a relatively simple device, but it requires some skill to make and use effectively. If your sons are interested in learning how to make their own bows and arrows, follow my guide for tips to get them started.
#This article contains affiliate links.
Materials to Make a Homemade Bow and Arrows Set
You probably have all of the things needed to make a bow and arrow. In case you do not, I am attaching links to help you. These are affiliate links.
For the Bow
To make the bow you will need:
You will need a strong, flexible wood for the bow, such as oak, hickory, or ash. If you do not have these exact species, try any type of wood you have on hand. Remember, this is for FUN. Your sons will not be providing dinner tonight from their bow and arrow (or they might be….that has happened at my house). The wood should be straight and free of knots. You can also use long dowels. Dowel Rods Wood Sticks Wooden Dowel Rods – 1/2 x 72 Inch Unfinished Hardwood Sticks
Paracord Tactical Parachute Cord Strong Survival Rope
Duct Tape The Original Duck Brand Duct Tape
Knife or Saw CRAFTSMAN CMHT20221 CFT 10-IN MINI SAW
Materials for the Arrows
You can use small wooden dowels, bamboo sticks, sticks from the backyard or even pencils as arrows. 25PCS Dowel Rods Wood Sticks Wooden Dowel Rods – 1/4 x 12 Inch Precut Dowels for Crafting
Fletching is the feathers or other material that is attached to the back of the arrow to stabilize it in flight. You can use feathers, plastic veins or cardboard. This will be an experiment to find out what materials you have on hand work best. 100PK 3 inch Plastic Arrow Vane TPU Fletching for DIY Arrow Archery Bow
Arrowheads can be made from metal, stone, or bone. You can buy arrowheads online or at a sporting goods store. If you don’t have arrowheads, just sharpen the material of your arrow to a point. 135 Grain Metal Broadheads 2 Blade Hunting Arrowhead for DIY Wood Arrow
You will also need string and hot glue or gorilla glue to secure everything.
After materials are gathered, now it is time to construct the bow!
Instructions for making the bow and arrows
1. Cut the wood for the bow.
You need a piece of wood about 4 feet long.
One easy way would be to cut down a young sapling and use this for your bow, but dowel shaped bows are easier to make and handle. If you have long dowel rods, cut to size.
Another way would be to take a saw and knife and cut a long flat piece of wood out of a branch or larger sapling.
2. Shape the wood.
Regardless of the method of obtaining the bow wood, use a knife or saw to shape the wood into a bow. Remove knots and other large bumps. Ideally, the bow should be thicker at the center and taper towards the ends.
3. Sandpaper the wood.
Smooth out any rough edges with sandpaper. It should now look like a long flat piece of wood, or like a dowel. It is okay if it is still a bit rough. I am sure Robin Hood’s bow was a little rough.
4. Make the bowstring.
Cut a length of paracord a little longer than the bow.
5. Notch the wood of the bow
Make notches where you want to attach the bowstring to. The notches should be deep enough to hold the string.
6. Attach the bowstring to the bow.
Make a loop in each end of the bowstring and loop around the notches at the ends of the bow. If it will not hold, you can use duct tape to help secure it. When you attach the bow string, you will have to gently bend your bow.
Now you have a real bow! Ready for the next step?
For the Arrows
1. Make the Arrows
Cut the dowels, wood, pencils or other material for the arrows to the desired length.
Test this with your bow to make sure they are the right size.
When the arrow is drawn back, the tip should be three inches in front of the hand holding the wood part of the bow.
2. Sharpen the Arrows.
Use a knife or saw to sharpen the points of the arrows. Wear safety glasses.If you are using arrow heads, you will not need to do this step.
3. Fletch the arrows
Attach the fletching to the back of the arrows. You can attach fletching with hot glue or superglue and string. You will wrap the string around the fletching and secure it with glue.
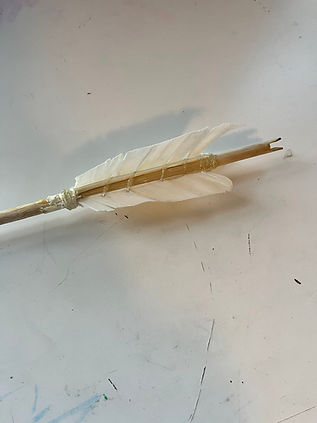
Homemade fletching from my crafty son
4. Notch the back of the arrow so it will fit into the string.
5. Secure the arrowheads.
If you are using metal arrowheads, you will need to attach them to the arrows with glue or epoxy.
You did it! You made a bow and homemade arrows!
Tips for Making Bows and Arrows
It is best to start with a simple design. There are many different types of bows and arrow designs and a person could spend their lives making an arsenal of homemade weapons. Just like everything else, a simple plan is best.
Patience is important. When children start working with wood and tools, they have to learn patience.
People can work for days, weeks, months….even longer to create beautiful and functional bows and arrows. It might take your child a few hours. This is the kind of perseverance we want to encourage.
Remind your child to not get discouraged if it doesn’t turn out perfect the first time. Creating functional and fun items takes practice.
Target Shooting
We have made it to the fun part, it’s time to practice target shooting! The more practice, the better the shooter.
To make a homemade target, use a big piece of cardboard or even tack a piece of paper to a tree.
Never shoot arrows at people or pets. Weapons, even toy ones, should be used responsibly.
Parents, if your son is not responsible with a weapon of any kind, take it from him. This is an important lesson.
Instill a Love of Creating and Archery
I hope you enjoyed this quick bow and arrow tutorial! My family loves archery and my sons have spent hours making and perfecting their homemade bow and arrows. They have often been surprised at how well they can use their bows. I hope your boys have the same success.
If you have any questions on this bow and arrow tutorial, leave a comment and I will try to answer quickly.
For more hobby ideas for boys, you might like:
The Thrill of the Bullseye: Why Boys Love Archery
Should I Let My Kids Play Airsoft Guns?
Metal Detecting for Kids: Going on a Treasure Hunt
Unique Hobbies for Homeschoolers- 14 New Ideas
Please save on Pinterest and other social media sites. Sharing helps my blog reach other like-minded moms and (homemade bow and arrows making kids!).